

Using Real-World Information for an Efficient Diagnosis Updated
A 2018 Update for 1Search Plus
When doing a repair, it is crucial to have a steady process in place. The best way to do this is through the classic, tried-and-true diagnostic process. As we walk through each of the steps, you will see how using a real-world information source is a great way to reduce diagnostic time and have more confidence when building and carrying out a diagnostic strategy. In the following examples, we will be using ProDemand, an auto repair information software that enhances your ability to perform and complete a diagnosis by seamlessly integrating OEM and SureTrack real-world information with its recently added 1Search Plus feature.
Okay, now that you know that real-world information can save on diagnostic time, let’s walk through each of the steps to see how.
- Verify symptom or complaint
- Analyze symptoms
- Isolate the fault through testing
- Correct the Problem
- Check for Proper Operation
1.) Verify Symptom or Complaint

This is the reason the customer brought the vehicle to you in the first place. In this first step, we’re really doing two things, understanding the problem and then replicating it.
Understanding the problem – This is the first step of the diagnosis, and it happens the moment the customer walks in the door. During this phase, we’re really trying to have an investigative conversation with the customer to find out more about their experience and perception of the problem. This is what you think of as typically a service writer task. Ask the customer questions, like are there any related symptoms? Basically, collect as much information as possible about the problem.
Replicating the problem – As you know, now you have to re-create the problem. Sometimes that can be done in the bay, but often, it means driving the vehicle to re-create the customer complaint.
Identifying Other Problems – Within the scope of our first step, verifying the symptom or complaint, we are going to be interested in identifying any other problems the vehicle may have. This is a great opportunity to use ProDemand’s Top 10 List! The list is comprised of the top common issues for that vehicle based off of real-world information. Quick and easy lists, like this one, in your repair information can provide deeper insights to a service writer or technician, allowing them to look for potential issues beyond the problem for which the car has been brought to the shop.

Looking at the various items in the lists above, we can see that there are a number of related items across the lists. If “Mrs. Jones” comes in because she has been seeing coolant that has leaked onto her driveway, you could just focus on diagnosing the engine cooling system (red underlines). But checking the top 10 lists could lead to more questions to ask or issues to look in to, like:
- Do you hear any screeching noises from under the hood? Is your AC blowing cold?
- There seems to be a “trend” for lean conditions and EVAP problems. I’ll look at it and let you know what I find.
- Have you had any no start or engine stalling issues?
2.) Analyze the Symptoms
Now that you’ve verified the symptom, it’s time to build a diagnostic strategy to solve the problem. This is where you do all of your thinking. There is a popular phrase in strategy – “plan the work, work the plan!” We are going to plan the work.
Start with your scan tools. I know it’s very basic, but pulling the codes from the vehicles is the start of analyzing your symptoms. You’ll need OEM information along with the code to better understand the meaning of the code, set conditions, running conditions, etc.
To really gain a silver bullet advantage to a quick fix and increase your overall efficiency, it is important to have a comprehensive and easy-to-navigate auto repair information software. As mentioned above, our following examples will be using the ProDemand auto repair information software, which is armed not only OEM information but with:
SureTrack: real-world repair information built from millions of actual repair orders.
1Search Plus: ProDemand’s new advanced search engine that streamlines the search process to only return the exact information you need in an easy-to-use, card-format graphical interface.
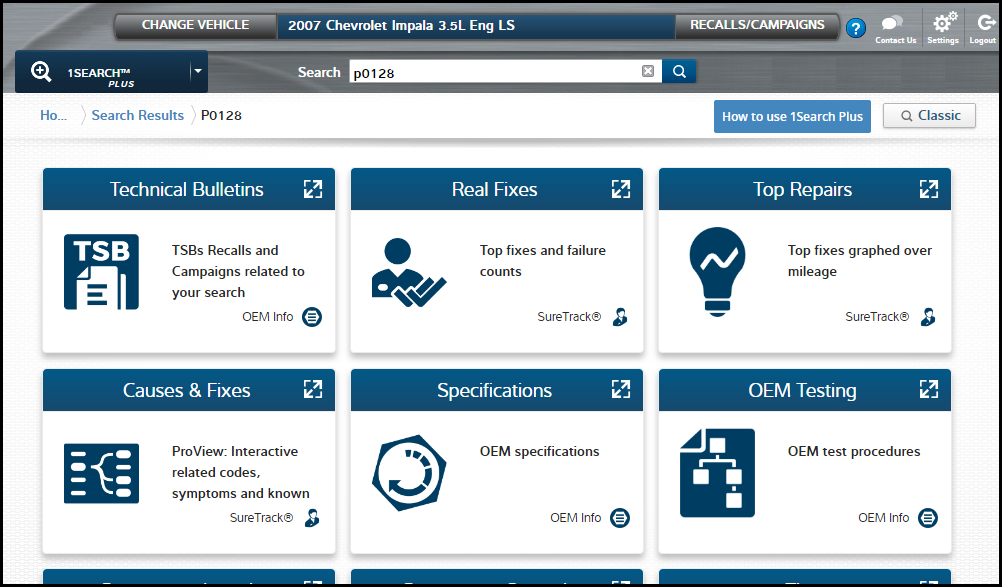
Features that make ProDemand with 1Search Plus stand out are:
- The most prominent feature is that ProDemand brings back information in a card format, similar to the app format we are all now so use to on our smart phones. Each card represents a discreet set of information, cutting down the time you spend scanning through the clutter of information overload.
- The cards are also returned in a workflow format, and if you notice, it follows the flow of the diagnostic strategy we are discussing. The first cards returned all deal with building your diagnostic strategy through symptom analysis, ending with the repair procedures when it is time to replace a failed component.
- OEM and real-world information are returned together and not in separate tabs. This makes your information lookup follow your natural diagnostic workflow.
- You’ll also notice that the same information is available in Snap-on Diagnostic Tools with the same software user interface experience.
Using the Top Repairs card and Probable Components list, technicians can begin to build a diagnostic strategy. You can start by asking yourself, “Which component do I want to test first? Which do I test second?”

Note: Just picking the top part isn’t necessarily the thing you should do. You probably want to prioritize your diagnosis with using intuition about how long it will take you to diagnose that part. For instance, if you get a p0445, maybe spend the extra minute to immediately check the gas cap.
How an Advanced and Beginning Diagnostic Tech Might Could Use the Information
For this example, let’s take a Ford F150 5.4L that is reading the code p0191. If you look up the code, it is a fuel rail pressure sensor code. On this particular vehicle, it means the pressure is out of range and is either too high or too low. For a beginning diagnostic technician, they may not have seen this code before and need to figure out where to even begin. They can look at the probable component list and use it as a checklist to prioritize which components to test. Let’s start with the fuel pump driver module, then take a look at the fuel filter and so on. Just imagine the time savings the beginning tech gains by using these real world sets of information to shortcut the 50 step OEM diagnostic procedure.
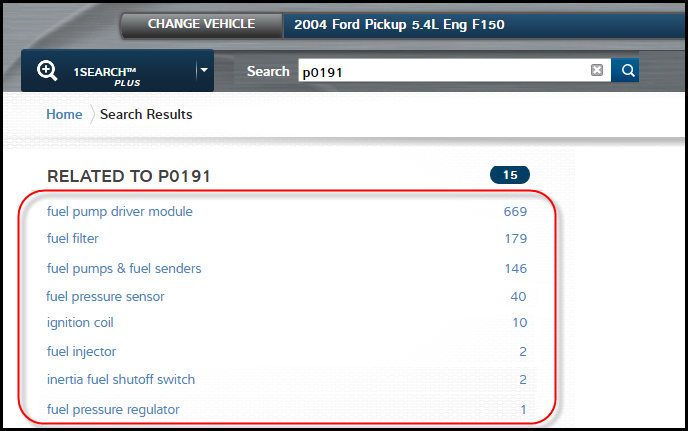
A more advanced technician might say, “Well of course, I know to check the fuel filter and fuel pump right away, those first few items on the list aren’t adding any value.” Well, do you see that ‘more’ link on the screen? When you click it, you will get the full list. Here is an issue that might not be so obvious. How about checking the inertia shut-off switch as a possible cause? So, for the advanced technician, real world information can help to provide that silver bullet of information when you’ve looked at all the obvious things and are still stumped.

Not Every Vehicle or Code Is The Same
Let’s take another example using the same Ford f150 as before; however, now you are reading a code p0171 with a lean condition (too much air in the air/fuel ratio). The real world information guides us to the spark plug/ignition coils/fuel filter as the top priority failed components. Now, if we look at a similar vehicle, the 2004 Chevy Silverado 5.3L, we get the intake manifold gasket/oxygen sensor/mass airflow sensor as the top priorities to look into. Being able to look at the most likely cause of a code per vehicle will save time versus having one standard way to diagnose all p0171s.


3.) Isolate the Fault Through Testing
Now that we have our plan in place, we need to execute the diagnostic strategy. Remember – plan the work, work the plan. In this step of the diagnostic process, you should isolate the fault through testing; we are working the plan! You can do this with Real Fixes and Guided Component Testing.
Note about part swapping: At the end of the analyze symptoms step, you could swap the part. Mitchell 1 and Snap-on does not endorse that. Instead, we recommend following the whole diagnostic process, including this step 3, isolating the fault through testing to be sure that you have properly identified the component at fault. Throwing parts at the problem is costly to the shop, costly to the consumer and leads to comebacks. Something that you never want to see happen.
Real Fixes
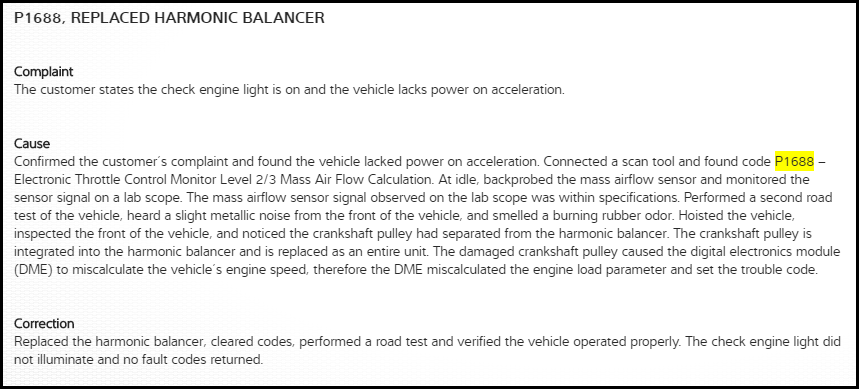
- What is a real fix?
A real fix is a brief case study of a real world diagnosis, giving you a complaint > cause > correction information. As a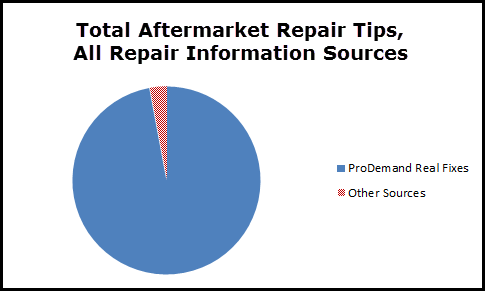 technician, you can match your codes and symptoms to the testing steps given on how you would test that component. Often in the testing steps, you’ll see some shortcuts to save time rather than using the way long way the OEM procedure tells you to diagnose the issue.
- The SureTrack information in ProDemand contains more Real Fixes than the other major repair information systems on the market combined. If you are looking for a source of real world information, ProDemand via SureTrack is it!
Guided Component Testing
Remember what I said about not swapping parts. ProDemand makes it as easy as possible to carry out a proper component test by providing all the information you need in one concise place as part of your 1Search Plus information return. The component test information gives component description, component location, best test location, connector end views and the tests to run. If there is a known good waveform, it is included in the test information.

Diagnostic Equipment
We have to mention other equipment and tests that can be ran, including:
- oscilloscopes (part of diagnostic tool) to look at voltage over time
- multi-meters – to measure voltage at a given point
- smoke machines – check for leaks in closed systems
- specialized equipment like fuel injection testing equipment
 4.) Correct the Problem
Now that we’ve identified what the component failure is, we can replace the component or components. The basic information you need is repair procedures, diagrams and specifications. All of which can be found in a repair information system such as Mitchell 1’s ProDemand. By using 1Search Plus, you’ll get a card for Remove and Replace.
5.) Check for Proper Operation
We always want to make sure that the problem has gone away and that we’ve successfully completed the job. Verify the fix by driving the vehicle; look for the original code or symptom and make sure it has been addressed.

Conclusion
To recap, we’ve looked at the diagnostic process from start to finish. Each step along the way, we’ve discussed where ProDemand with 1Search Plus and integrated real world information can make you diagnostic process more efficient.
- Starting when the customer first arrives at the shop by helping you to identify common problems with this specific vehicle.
- To analyzing symptoms – Common Repair Procedures Graph and List of Probable Components to build a diagnostic strategy.
- To Isolating the fault – using real fixes and specific component test information
- You can then correct the problem using your OEM repair information source
- And check for proper vehicle operation that you’ve fixed the problem to complete your diagnostics work.
Using a Real World information source, like SureTrack, is a great way to reduce diagnostic time, and have more confidence when building and carrying out a diagnostic strategy.