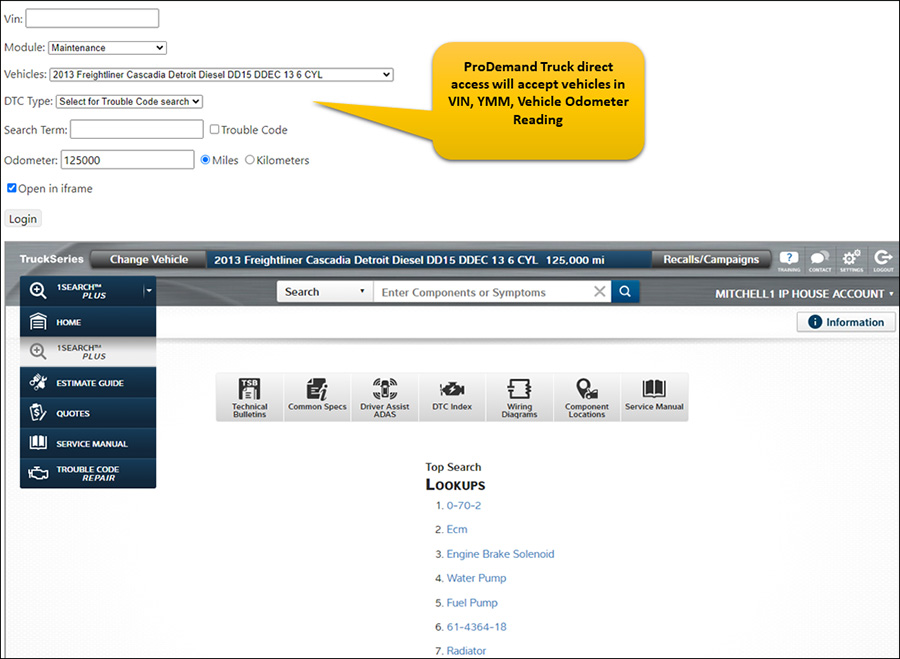
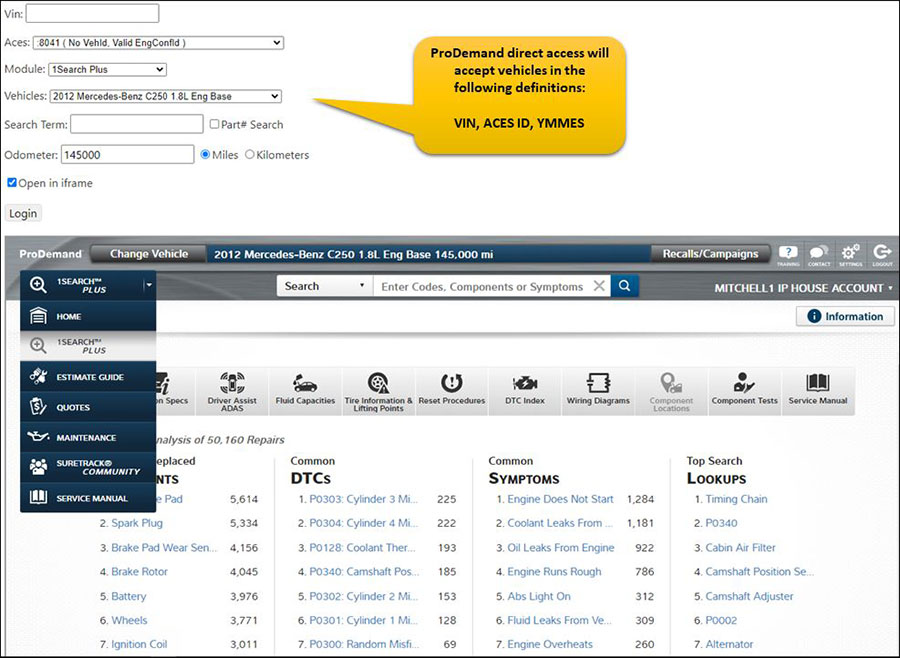
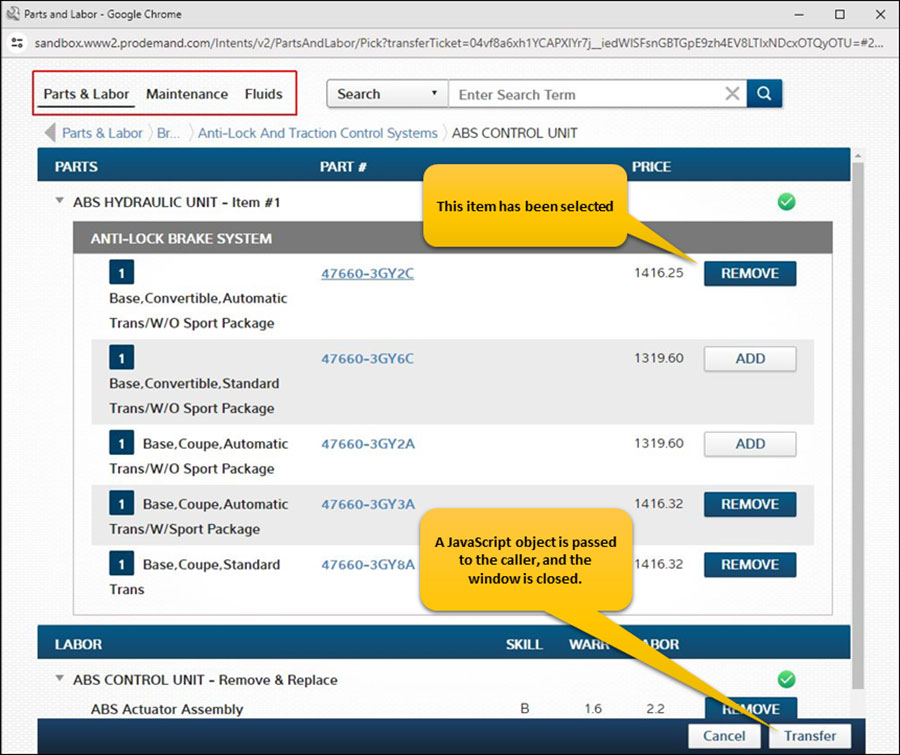
Mitchell 1 provides TPMS information to Modern Tire Dealer, an award-winning publication that writes editorial content geared to independent tire dealers. We’re sharing this content in our blog, with a link to the Modern Tire Dealer website where you can read the article in full. The TPMS information in this article may also be accessed in either the TPMS or the reset procedures quick link in our ProDemand® auto repair information software, along with other important reset procedure data for the selected vehicle.
Subject Vehicles: Honda Odyssey 2011-2019.
Special Tools Needed? The Honda Diagnostic System (HDS) or an OBD II compatible scan tool, and an ATEQ VT55 tool (recommended), or the TPMS sensor tool AKS0620006 must be used to program information into new TPMS control unit with both reset procedures. The TPMS Sensor Tool (AKS0620006) has been superseded by the ATEQ VT55 tool, and is recommended for use on all Honda vehicles. Whenever a 2011–2019 Honda Odyssey’s speed exceeds 28 mph, the tire pressure monitoring system (TPMS) control unit monitors all four tires and the system. If it detects less than 28 psi (190 kPa) it alerts the driver by turning on the low pressure indicator and setting a diagnostic trouble code (DTC) in the control unit. When the tire pressure is increased to more than 30 psi (210 kPa), and the vehicle is driven above 28 mph, the control unit will turn off the indicators and store the DTC(s). If a problem is detected in the system, the TPMS indicator will come on. If low tire pressure and a problem in the system are detected, only the TPMS indicator comes on. When the system detects a problem, the TPMS control unit sets a code, but shifts to fail-safe mode, and does not alert the driver to low tire pressures. If the TPMS control unit loses power or fails, the TPMS indicator will come on, but no DTC will be set. Each sensor is an integrated unit made up of the tire valve stem, a pressure sensor, and a transmitter. The unit is attached to the inside of the wheel, around the valve stem. Each low pressure sensor has its own ID to prevent jamming by similar systems on other vehicles. After memorizing all of the sensor IDs, the control unit receives only those specific signals. Sensor memorization after normal tire rotation is not necessary.
TPMS Warning Indicators: NOTE: Tire pressures will increase slightly as the temperature in the tires rises during driving at highway speeds. Pressures also will increase or decrease slightly with changes in outside air temperature. A temperature change of about 18 degrees Fahrenheit (10 degrees Celsius) will change tire pressure by about 1.5 psi (10 kPa). If the temperature drops and then rises, tire pressure could decrease just enough to turn on the low pressure and tire(s) indicators, but later increase enough to turn them off. To resolve a complaint of such intermittent indications, confirm and clear the stored DTC(s) and check the tire pressures. Then explain to the customer how temperature changes can affect the system, especially when tire pressures are near the low end of the TPMS normal range — 24-32 psi (168-220 kPa). NOTE: If the outside temperature is at or below -40°F (-40°C), the system may not function properly. If low tire pressure indicator is lit continuously, due to low pressure in one or more tires, adjust tire inflation to proper pressure as indicated on the tire and loading information placard. The light will remain on until tire pressure is properly set. If warning light is still lit, or the TPMS indicator is lit continuously, there is a problem in the TPMS. See appropriate manufacturer service information. If a problem is detected in the system, the TPMS indicator will come on. If low tire pressure and a problem in the system are detected, only the TPMS indicator comes on. When the system detects a problem, the TPMS control unit sets a code, but shifts to fail-safe mode, and does not alert the driver to low tire pressures. If the TPMS control unit loses power or fails, the TPMS indicator will come on, but no DTC will be set.
TPMS Reset Procedures: NOTE: When a tire pressure sensor or control unit is replaced, or a known-good wheel is substituted, the ID(s) of all four tires’ sensors must be memorized by the TPMS control unit (see “Memorizing sensor ID”). After memorizing the sensor ID(s) or doing a tire rotation, the mounting location of sensors 1, 2, 3 and 4 must be determined. When the “activate sensor” signal is sent to each wheel using the ATEQ VT55 tool (recommended), or the TPMS sensor tool AKS0620006, in sequence, the tire pressure sensors can be located by the reaction sensor number (see “Sensor location”). NOTE: If a flat tire is replaced with the spare tire, the TPMS indicator will come on, and DTC(s) will be set, because the system is no longer receiving the signal from the flat tire’s transmitter. This does not indicate a problem with the spare tire. NOTE: The Honda Diagnostic System (HDS) or an OBD II compatible scan tool and an ATEQ VT55 tool (recommended), or the TPMS sensor tool AKS0620006 must be used to program information into new TPMS control unit with both reset procedures. The TPMS Sensor Tool (AKS0620006) has been superseded by the ATEQ VT55 tool, and is recommended for use on all Honda vehicles. If low tire pressure indicator is lit continuously, due to low pressure in one or more tires, adjust tire inflation to proper pressure as indicated on the tire and loading information placard. The light will go out once the tire pressure is properly set, and the vehicle is driven above 28 mph.
Tire Pressure Sensor Registration: NOTE: The TPMS Sensor Tool (AKS0620006) has been superseded by the ATEQ VT55 tool, and is recommended for use on all Honda vehicles. NOTE: To ensure the control unit memorizes the correct ID, the vehicle with the new sensor must be at least 3 m (10 feet) from any other TPMS pressure sensor not installed on that vehicle.
Memorizing Sensors Automatically (2018 models and later): After rotating the tires or replacing a tire pressure sensor, drive the vehicle for at least 40 seconds at a speed of 15 mph (24 km/h) or more, and all of the sensor IDs are memorized automatically. NOTE: After the sensor IDs are memorized, reduce the pressure in all four tires to less than the specified tire pressure lower limit, and check to see that the four tire indicators come on.
Memorizing Sensors with the HDS: NOTE: The TPMS Sensor Tool (AKS0620006) has been superseded by the ATEQ VT55 tool, and is recommended for use on all Honda vehicles. 1) With the ignition switch in OFF position, connect the HDS to the 16-pin Data Link Connector (DLC) located under the left side of the dashboard. 2) Turn the ignition switch to ON position, and verify that HDS is communicating with the TPMS control unit. NOTE: If “Not Defined” displays on the HDS, turn the ATEQ VT55 OFF, rotate the tire 1/4 turn, turn ON the initializer, and try to initialize again. Repeat procedure until a response is shown. NOTE: If the vehicle’s ignition switch is turned OFF before all sensors are memorized, the memorizing ID is canceled. 3) Hold the ATEQ VT55 tool (recommended), or the TPMS sensor tool AKS0620006 near one wheel, and memorize the pressure sensor ID by following the screen prompts on the HDS. If TPMS control unit is still having trouble learning ID(s), refer to appropriate service information. 4) Repeat the last step for each wheel until all four sensor ID(s) are memorized. When all are memorized, the low tire pressure indicator will blink. 5) Turn ignition OFF. 6) Test drive the vehicle at 28 mph or more for at least one minute. Monitor the low pressure indicator to be certain it does not blink. NOTE: If it has been more than five minutes since the end of the last test drive, the tire pressure sensors will need to be reactivated with the ATEQ VT55. 7) Turn the ignition switch OFF, reduce the pressure in one tire until it is below 28 psi then turn ignition switch ON. 8) Test drive the vehicle at 28 mph or more for at least one minute. Verify that the low pressure indicator turns on. 9) Verify that the low pressure indicator turns on, and then re-inflate the tire. 10) Repeat steps 7 through 9 for all other tires. Clear any DTC(s) with the HDS.
Demounting/Mounting Procedures: CAUTION: The tire should be demounted from the wheel using the tire changer manufacturer’s instructions. Use the following information to avoid damage during the demounting/mounting procedures. NOTE: When a tire pressure sensor is replaced, the sensor ID must be memorized by the TPMS control unit (see “Reset procedures). NOTE: Vehicles equipped with TPMS must use wheels made for the system, or the system will not work. On all models, a “TPMS” mark is visible on the wheel, and a counterweight is cast into the opposite side of the spoke to balance the weight of the sensor.
Tire Pressure Sensor: CAUTION: Fluid sealant used to repair a punctured tire can damage the tire pressure sensor mounted on each wheel. It can prevent the system from detecting the correct tire pressure and set a DTC even though the system is normal.
Removal:
1) Raise the vehicle, and support it with safety stands in the proper locations.
2) Remove the wheel with the faulty sensor.
3) Remove the tire valve cap and valve core, and let the tire deflate.
4) Remove any balance weights, and then remove the tire from the wheel with a commercially available tire changer.
Note these items to avoid damaging the tire pressure sensor:
- Do the outside of the wheel first.
Position the wheel as shown so the valve stem is 90 degrees from the bead breaker (see Figure 1).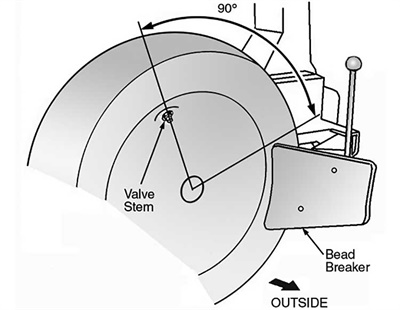 Figure 1
- Position the wheel so the tire machine and tire iron are next to the valve stem, and will move away from it when the machine starts. Then remove the tire from the wheel (see Figure 2)
 Figure 2

5) Remove and discard valve stem nut, then remove the tire pressure sensor and valve stem from the wheel. If the valve stem nut cannot be removed by hand, spray valve stem with rust penetrant, then CAREFULLY remove the nut with pliers. NOTE: The valve stem grommet might stay in the wheel; make sure to remove it.
6) Remove the valve stem nut (A) and the washer (B), and then remove the tire pressure sensor with valve stem (C) from the wheel (see Figure 3).
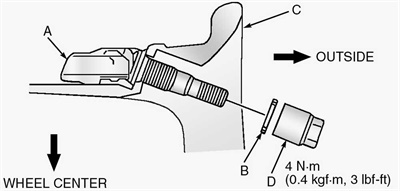 Figure 3
Read more: